
If you want a natural-looking wig but don't want to spend too much time on installation, then the Nadula Affordable Yaki Straight Bob Wig is the perfect choice. This wig looks just like your own hair, with a very realistic hairline, and it's super easy to wear, big head friendly. If you're new to wigs and looking for a beginner-friendly way to wear one, then check out this article.
In this article, YouTube influencer Kie RaShon shares a full review of the Nadula Yaki Straight Bob Wig, demonstrating how to install, customize, and style it. The naturalness, softness, and price of Nadula Hair wigs will definitely surprise you.
The Full Reviews Of Yaki Straight Bob Wig By Kie RaShon
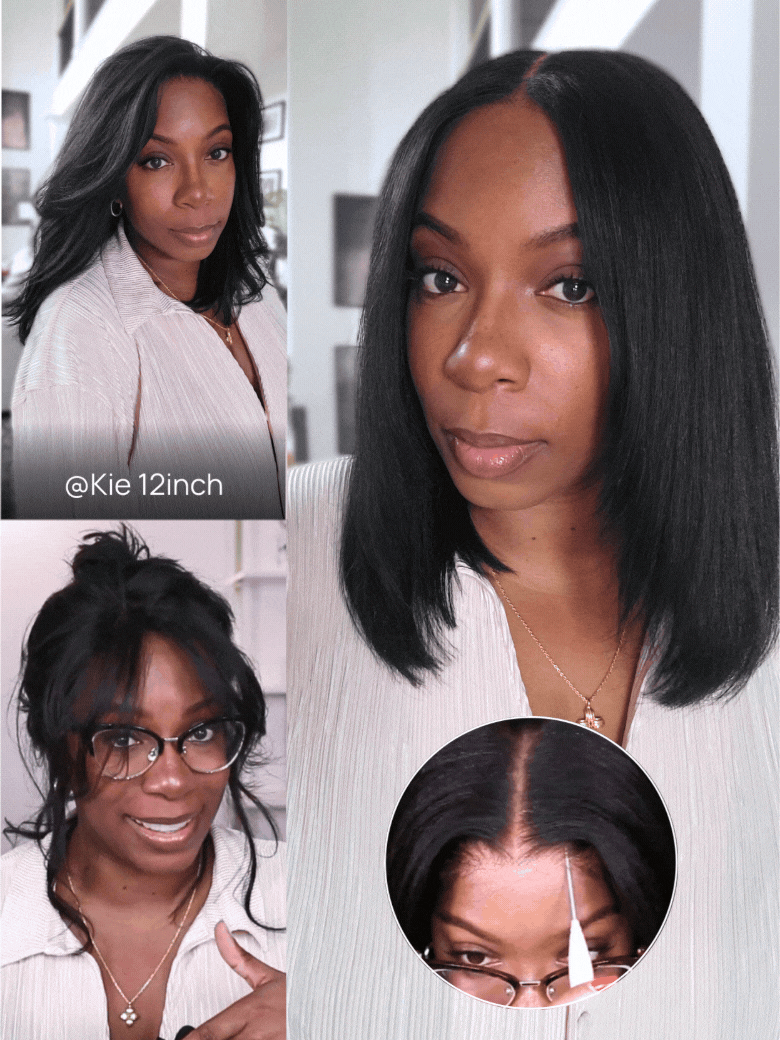
This bob wig is from Nadula Hair and is 12 inches long. It's made with HD lace. It looks very pretty and thin. This wig comes with all the necessary accessories, including a comb at the back, an adjustable drawstring elastic band, and it's a 7x5 lace closure wig. Just taking it out of the packaging, you can see how beautiful it looks.
This product comes in four different caps. The lace area is always 7x5, but the density may vary depending on the style you receive. The 7x5 drawstring version has a 150% density. The layered 7x5 drawstring wig has a 180% density. There's also a 7x5 drawstring wig with a side part, or a 13x4 drawstring wig, both with a 150% density. My wig has a 180% density because it looks fuller and thicker.

This wig looks amazing. The natural and realistic hairline looks fantastic. The Yaki straight texture is very soft. I also love that the pre-plucked hairline, pre-cut lace, and pre-bleached knots are all very well done.
How To Install The 7x5 Yaki Straight Bob Wig?
I'll teach you how to wear this affordable, glue-free, and ready to wear wig.
Step 1: Fix the Wig
Because the wig has a slight odor, we'll first spray some dry shampoo to remove the smell, then spray some water on the hair to soften it slightly.
Step 2: Dye the Lace
Because this sheer lace is unbleached, it looks very transparent. We need to dye it so it matches my forehead color. Using the darker shade from the contour palette, mix the contour and shaping colors and apply only around the forehead. You don't need much; just lightly dab or brush it in, quickly applying it to the edges.
Step 3: Put on the Wig
Put the wig on your head, aligning the lace with your natural hairline. Secure the combs on both sides, then adjust the drawstring at the back, pulling it tight to ensure it doesn't stick up. Tighten it to secure the position, then tuck any excess hair in. The wig is now on.
Step 4: Blend the Hairline
Slightly adjust the wig behind your natural hairline. Use powder to soften the lace and gently style the hair at the front. Since the wig has been pre-plucked, almost no additional work is needed.
Step 5: Trim the Ends
Cut the ends of the wig diagonally on both sides with scissors, ensuring symmetry. Trim to your desired effect.
Step 6: Color the Parting
I used Black Radiance Soft Focus Powder, shade Creamy Bronze, to color my parting area. Just pat it on lightly. Only color the part behind the hairline, as the front has already blended with it.
Step 7: Create a Bob Wig Style
After installation, we can style the wig to enhance the overall effect. If you want more volume, curl the hair. No glue needed. Use a curling iron to create cute little curls. If you want the curls to hold better, spray some hairspray while curling to give it movement. We can also create a middle part hairstyle; you can style it whichever way you like. Human hair wigs like Nadula can be safely styled using heating tools, and we can customize our looks for different occasions.

