
Nadula auburn kinky curly wig save your edges and your coins. Today I’m installing this gorgeous $100 Auburn Kinky Curly Wig from Nadula Hair, it’s a 100% no-glue install, so your edges are protected and your install is beginner-friendly!
If you have been looking for an affordable, natural-looking curly wig that blends well, installs easily, and won’t damage your hairline, this kinky curly edges wig is the best one. Watch as I unbox, prep, install and style this Auburn Kinky Curly unit step-by-step. Full review and install by Kie RaShon.
In this article, you can learn how to install a $100 auburn kinky curly wig without glue! This tutorial details prepping the wig, tinting the lace, and styling the unit for a flawless look. Discover tips and tricks for achieving perfect curls and edges.
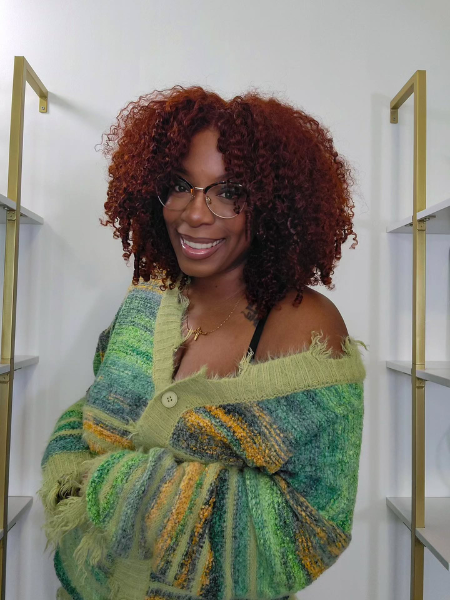
Kie Review of Nadula Auburn Kinky Curly Edges Wig
This hair from Nadula is absolutely amazing, and the price is great at $109. It's so easy to style. My wig is a 7x5 curly lace front wig with finger curls at the ends. I chose the 16-inch length with 180% density. This wig has combs, an elastic band, and a drawstring at the back. Therefore, it should feel very secure.
My head is quite large, size 23, but this wig is very comfortable to wear. The $100 curly reddish brown wig is also very popular. I did experience some shedding when washing it, but I think that's quite normal. This 180% density wig looks pretty good.
How To Install The Auburn Kinky Curly Wig Without Glue?
Step 1: Prepare Your Wig
I washed my wig because it had an unpleasant smell, and it didn't look the way I wanted it to. You should always wash your wig first. So I deep-cleaned the wig and then washed it with shampoo and conditioner. Now it smells great. I also sprayed some of my hair perfume on it to make it look even shinier.
Step 2:Dyeing the Wig Cap
Before I put on this wig, let me dye the wig cap first. I'll be using my Black Radiance contour palette in the medium to deep shade. I'm using a mix of the contour and sculpting shades. I shouldn't need too much since it's only 7×5 inches. So I only need to apply it around the hairline. I'm planning to keep it simple with a middle part today.
Step 3: Plucked Your Hairline
I put the wig on my head, and then I might need to go in and pull out some hairs to get the hairline to look the way I want it. The hairline is cut right at the edge. I need to quickly pull out some hairs. Pull it back like this. It comes out easily. Then I apply Nairobi mousse to the edge of the hairline and curl these small strands of hair, and that gives me a natural-looking hairline.
Step 4: Trimming the Ends
Because the ends look a little frizzy, I'm going to trim them. I won't cut off too much, I'm just going to trim some of the ends that look a little frizzy. I'll bring both front sections of hair to the middle, flatten them, and then use scissors to trim them slightly, then use my fingers to create finger curls. Then I'll use my comb to style the hair and make the curls more defined.
Step 5: Volumizing Your Hair
Apply mousse evenly to your hair, allowing it to be fully absorbed. Once the hair is damp, create finger curls. This will make the hair more voluminous and full after drying. Damp hair is easier to style. Then, blow-dry your hair with warm air. Reach your hands under your hair. Create finger curls to make the hair look more voluminous and full. Do this at the back of your head with a comb to ensure the back of your hair is also voluminous.
Step 6: Styling the Hairstyle
Use the cool setting on your hairdryer to thoroughly dry your hair. The drier the hair, the more voluminous it will be. Then use some hairspray; I use Tresemmé strong hold hairspray. Spray a few times on your hair, then scrunch your hair to help set the style. You can then use a comb to fluff up your hair, and you'll have a perfect hairstyle.
Get The Same Red Curly Wig As The Video
Hair info: 7x5 Auburn Kinky Curly with Finger Coil Ends 16 inch 180% Density