


As we all know, wigs are already an essential item for women, especially for black women, wigs can easily help us achieve the fashionable hairstyle we want, without having to wait for the natural hair to grow slowly, and without going through Various coloring and perming processes damaged hair. So how can you buy high-quality and cheap wigs? Today we are going to recommend an affordable bob wig that doesn't break the bank. Read on for more information.
1. About The Affordable Bob Wig
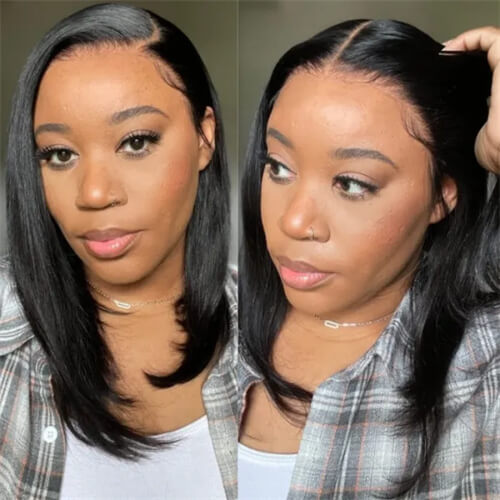
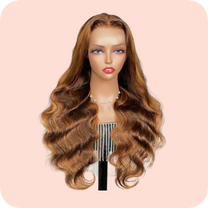
- Product Name: Nadula Straight Short Bob Wig Lace Frontal 150% Density Wig Pre-Plucked 100% Human Hair Super Soft
- Hair Length: 8-14 Inch
- Cap Size: Average Size (Head circumference:54cm-58cm )
- Cap Type: Swiss brown lace, T part lace
- Lace Size: 13x4 lace
- Density: 130%, 150%
- Items / Pkg: 1pcs/pack
- Hair Texture: Straight Bob
- Hair Color: Natural Black
- Hair Quality: 100% virgin hair, tangle free, no shedding, soft & bouncy.
- Characteristics: Virgin hair acts naturally, shed free and comprises thick & strong strands, not easy to break.
- Processing Time: Ship the order within 24 hours after order confirmation, except for weekends and holidays.
- Delivery Time: USPS overnight 2-3 business days; USPS 3-7 business days; DHL/UPS 5-10 business days
- Payment Method: PayPal, Afterpay, Klarna, ZIP Quadpay, Visa, Discover, etc.
Bob wigs are very popular this year and are a very minimal style that will look very refreshing in spring and summer. This straight short bob wig is very cost-effective, has 100% high-quality human hair, 130% and 150% two densities to choose from, a 13x4 lace front wig without bangs, is easy to wear, is very natural looking, and cheap price.
The Customer Reviews
P***i
My overall experience was okay the communication was okay. Moreover; the hair is soft and shiny, with minimum shedding after I washed it. All in all, this wig is worth buying, my girls.
L***a
I received it with no issues, the hair is super silky. It doesn’t smell and the knots are barely visible so I may not even have to bleach them. I’ll be installing soon and I’m excited
B***o
Okkkayy so I was a little nervous about buying but glad I purchased !! Love it !! 1st glueless wig for me and i dont think it will be my last!!
J***n
I'm in love with this one! This wig was better than even described. It’s perfect, 100% human hair , very soft, hardly any shed&Fast shipping. Good customer service. Amazing hair wig! It doesn't shed!
2. How to Install The Affordable Straight Short Bob Wig?
Let's take a look at how to install this affordable straight short bob wig, you can see the detailed installation process and explanation.
hey guys, today I will be showcasing an affordable Bob unit. This is a 13x4 lace frontal Bob wig from nadula, this one is in the length 14 inches,150% density, and pre-plucked, it's looking really good. and then as far as your cap construction goes, two combs on the side, a comb in the back, the adjustable strap, and a removable elastic band, bleach the knots on my unit. I'm gonna cut off some of that lace on the side by my ear, and you can see how natural that looks. I installed it today, I will be going in with my Spritz, I want a very light hold, so I'm just going to take my time and work in sections. I'm just using the end of this edge brush, it has a little retail at the end, and I'm just kind of pressing the lace down and then on the side. You do see me spraying some on the lace and then I'm just going to use my blow dryer to speed up the drying process. I'm gonna just go back around the front of the hairline with a little bit more Spritz, but I just sprayed it on the end of this comb, and I'm just kind of pressing everything down because I did see some areas were rolling up. Then I'm just going to place my elastic band on, so everything can dry down all of the way and just kind of melt and settle in.
I'm gonna place some of my wax at the top of this unit, just to kind of get everything to lay down, and then I'm going to use my hot comb to press everything out. I'm also going to go around the hairline area. Now, this unit does come pre-parted as a middle part, however, you can park this on the side. I am going to show you guys two ways to rock this unit and how easy it is to kind of switch between the parting space area. But as you can see everything is laying down really nice and flat like look at that one side. This taco place has no games, I'm just pressing everything out because of course I want this to be really nice and flat now, I'm rocking a straight look today. Then I want it to be no humps and no lumps, as I did scrunch up the hair and it does have a nice wave pattern to it, I need to straighten this out, so I want to kind of work in sections. I do have my flat iron turned up all the way, so I did have to do a couple of passes just to knock those waves out, but I do feel like it's straightened really well.
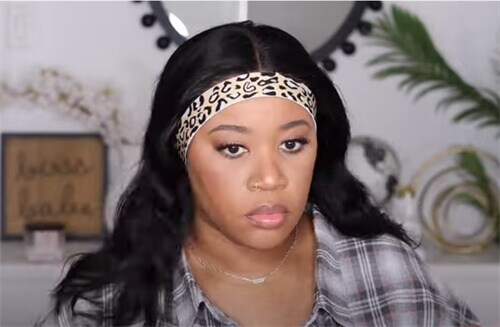
I'm just going to clip this hair back, so I can take my elastic band off. Look at this hairline, just to kind of make sure that everything is looking good. This is swiss brown lace, I thought I was going to have to go in and tint it for a minute. I'm also going to cut out a little bit when I pull out a little bit of hair in the front to create little swoops. Now as you can see I'm not doing anything heavy because I feel like the hairline area looks good. I didn't have to go in and pluck this hairline at all. Y'all feel like for straight out of the box, they did a really really good job, so this is going to be great for a beginner who just is not a fan of plugging or they feel like they don't want to mess it up. As you can see I'm just doing light swoops, I don't want to take her away from the front of the hairline area. Then I'm going to go in with a little bit of my powder into the parting space, just to kind of open it up a bit more and just put a little bit on the side. Now I'm just going to put a little bit of my Sleek and Shine Serum throughout this hair, and you definitely are gonna need it because I did notice some frizziness going on, not a lot of flyaways.
The Final Look As a Middle Part
The final look as a middle part, I feel like this came out really cute, I am loving the length and the density, this is also really nice, now addition does come in 130% density if you feel like this is just a little bit too thick, but I feel like the 150% you should definitely go with it, 130% might be a little bit too thin. You also can get this unit in 10 inches and 12 inches, had no issues with bleaching the knots on this unit, and then the hairline like I said, I didn't have to go in and pluck out anymore.
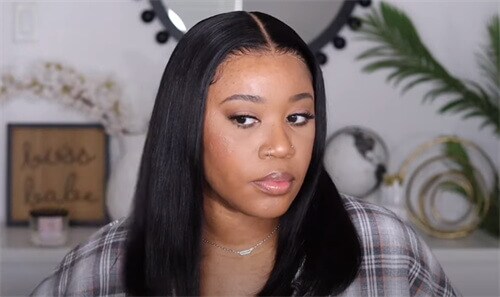
The Final Look As a Side Part

Now I want to show you guys what this unit looks like as a side part, so I decided to do a curved side part. Now I did have to kind of go in between the parting space area and then just use my wax and take my hot comb and press it out a little bit more because I want this to lay really nice and flat as a side part, also I don't want any humps going on, definitely didn't take me long at all to do. The density in between the parting space area is not high at all, so you're not gonna have to worry about it looking lumpy. Since I was looking pretty good still, so I'm gonna just tuck it behind my ear, and then I'm gonna make sure that I'm not going to be showing any tracks. I'm going to cut that side hair down a little bit more, but I'm not going to swoop it, because I still want it to look really natural. And I'm going to take my powder and go into the parting space area, you see how well that opens up when you put a little bit of powder! This is the final look as a side part, and I don't know which one to pick the middle or the side, It all looks very beautiful and natural. If you are interested in it, you can click here to buy it, it is definitely worth the money.


)

)

)

)

)

)

)

)

)

)

)

)

)

)

)

)

)

)

)
)

)

)

)

)


)

)

)

)

)

)

)

)

)

)

)

)

)

)

)

)

)

)

)

)

)


)

)

)

)

)


)

)

)


0 Comments
Write For Us | Comments Form